Category Archives: Ancestral (‘Primitive’) Skills

Elderberry Pipes

Elderberry Pipes

Elderberry (Sambucus sp.) is a fantastic tree to make pipes from. (It also has edible flowers, berries, and many other uses). It’s easy to make pipes from elderberry because it’s inner pith (the central tissue of a large woody stem) is very soft and spongy. To make a pipe, the California Indians would ram the pith of sections of elderberry sticks with sharpened, fire-hardened sticks of a hard wood such as mountain mahogany (Cercocarpus betuloides). Such simple tubes of elderberry were packed with tobacco and smoked, or formed the stem of a pipe having a bowl of stone or clay.

I have not read of any Indians making pipes like mine above. I cut sticks in sections just behind a right angle bend, and on the other side of the fork, left room for the pipe stem. So after I formed a tube from the main length, I carved out a bowl from the nub of the fork, and carefully connected the bottom of the bowl to the tube with a thin tube I drilled perpendicular to the first tube. I used a long flathead screwdriver that I sharpened at the tip for the initial drilling, then cleaned out the tubes with a round bastard file. I stained the pipes with linseed oil to protect them. The staining really brings out the beautiful patterns left on the inner bark by bark beetles.

I used only dead, downed wood, so there was no need to dry or season the wood, nor cut any live tissue. The species in the SF Bay Area is Sambucus nigra ssp. caerulea. The first few uses, I smoked plentiful material and didn’t inhale, in order to “cure” the bowl; leaving it thoroughly burnt inside so future smokes don’t have me inhaling elderberry wood smoke. (The pic shows them freshly cut; after curing the bowls are charred black).

I have been using such pipes for smoking herbal blends for years and prefer them (for functionality) any other I’ve ever owned. I’ve made about six of all sizes. They each took about 30 minutes total work time.

How to Make Moccasins: a Photo Guide

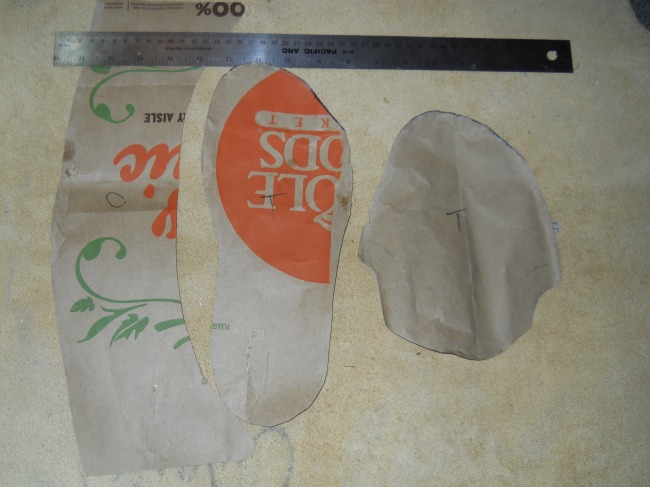
1) First, trace your foot on some paper to make the pattern for the sole. You should leave a centimeter or so space between your foot and the edge of the pattern:

Image


Image


2) Trace these other patterns based on the size of the sole pattern. Analyze the below photos to determine the relative shapes / sizes. See step the third photo below to better size the tongue pattern (pattern on right side). Basically it should cover the top of your foot and its sides wrap around to meet the edges of the sole pattern with sufficient space (~ 1cm) to stitch.

Image

ImageImage

4) Check the patterns have the right size and shape by lightly taping the edges to form a model of the moccasin.

Image

Image

5) After correcting for any size / shape problems revealed by the model, trace the patterns onto your leather (or other material of choice). Be sure to flip the patterns after tracing one side to make a mirror-image set of patterns for left and right foot. Mark each with an L or R to keep track of which go together.

Leather is usually irregularly shaped, so try different arrangements to fit all the patterns with as little waste as possible (in case you want a pair of replacement soles or for other uses).

Here, I used bison leather since it is very thick. In retrospect, the sole wore through rather sooner than I expected. Perhaps the wide grain size made for a more “loose” matrix of collagen in the leather, allowing it to wear sooner. I did wear them every day on concrete, so that’s another issue. I’ve read the Apache used rawhide soles to extend wear life. I may try this next. Fortunately the soles are easy to replace.

ImageImage

6) Put together the first moccasin, putting the inside facing out, and holding the edges (to be stitched) with pins.

ImageImage

7) Stitch the seams. Here I used artificial sinew divided in half (since it was then doubled around the pin eyehole, the stitches ended up being the same thickness as the original strand). To save a lot of effort, use a glovers needle (these are for leather and have really sharp tips with a triangular cross section). I used a whipstitch (aka lazy stitch), and used a sweet potato to put under the seam where I was pushing the needle in, so it easily went through the other side. Bison leather is super thick, so I had to use some pliers to pull the needle the rest of the way through from the other side.

Important note!! The below photo is incorrectly sewn where the back meets the tongue. It should be the opposite, with the tongue closest to the outside, so when you turn it inside out when you finish, you want the backs to be closest to the outside (see complete moccasin). I had to cut and resew the stitches on the below photo!

Image

8) The below photos show the complete, correctly sewn, moccasins before and after being turned inside-out.

ImageImage

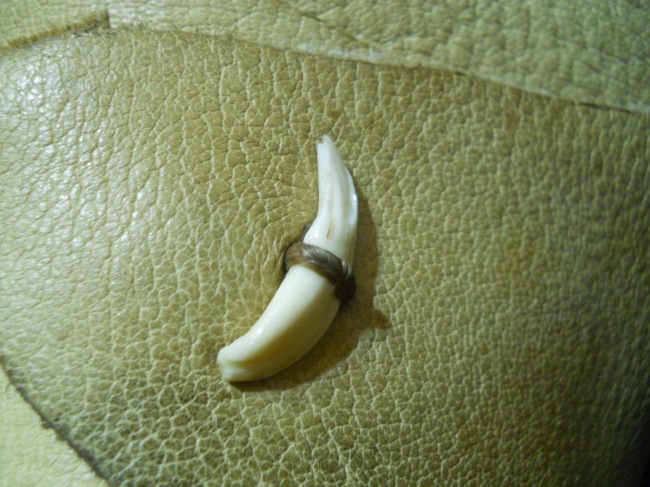
9) The completed moccasin! For this design (of my own invention), you will need a button of some sort to hold the sides that go over the tongue together. I used the canines of a grey fox skull I found for this. Except for thorough cleaning, you actually don’t need to unbutton and re-button it to put on the moccasin. Simply push down the heel, slide your foot in, then pull the heel up. They still fit very well and are extremely comfortable and good for running or anything else (except maybe wet weather which speeds the wear on the soles).

So the button can be difficult to unbutton or you could simply sew it permanently shut. I show some close-ups of the button I used below. The long cylindrical shape is cool since you can twist it and insert it into a small hole by the end. To get the sinew to stay wrapped on the canines, I had to file a shallow trench around the canine which the sinew could sit inside, then I tied it really tightly. Other button ideas I had was using shells, a strong twig, or a slice of a maple wood twig for a more conventionally-shaped button.

Note the below photos are after several months of wearing these all day every day, mostly on concrete, and never having washed them. They are easy to wash; just use warm water and soap to scrub by hand then let them air-dry.ImageImageImageImage

How to Make a Rabbitstick (non-returning boomerang)

Ringtail Cats

See my earlier posts How to Make a Returning Boomerang and Boomerangs are awesome! for more info about boomerangs.

The non-returning boomerang, aka rabbitstick was a ubiquitous and important weapon among hunter-gatherer cultures around the world, especially those living in open environments like desert, scrubland, and grassland.

The rabbitstick was used, obviously, to hunt rabbits, but also many other animals such as ground fowl, squirrels, and even large ungulates such as deer. The rabbitstick could instantly kill smaller animals when struck, but could also take down deer and antelope since it could break their legs, rendering them unable to flee.

The rabbitstick took many forms, but was always flattened and a foot to several feet long, and was usually bent along its length. Being thrown bend-first (with the V facing forward), the angle gave more force to the blow if it hit properly since the momentum would be directed along the…

View original post 934 more words

How to Make a Returning Boomerang

Ringtail Cats

A returning boomerang is not just a cool toy: this is a weapon useful for killing birds in flocks, and as a hawk decoy to flush waterbirds into nets.

What do you call a non-returning boomerang? A stick!… Not! Actually, although what most think of as a “boomerang” is the returning kind, most boomerangs used traditionally by Australian Aborigines were non-returning, but still specially designed to be thrown long distances in a straight line to deliver a lethal blow, as well as used for many other purposes.

See my post Boomerangs are Awesome! for background info and more about technical principles about boomerangs.

Steps to make a returning boomerang:

1) obtain a section of wood with a bend measuring 90-120 degrees. It must be from a fork, or bent root so the grain follows the bend. If you cut the proper angle into a straight piece, the boomerang will…

View original post 413 more words

Boomerangs are awesome!

Ringtail Cats

I was at the library checking out a book on sling and slingstone archeology, and next to it was a book on boomerangs! So of course I got it. My dad had a nice wood boomerang when I was a kid, and I played with that and some plastic ones at one point too. They are much harder to get to return than you might think. I never got the wood one to work, and I was always scared it would hit me on returning.

We tend to think of the boomerang as a toy, or novelty, but it was a nearly-ubiquitous and very important weapon, tool, and religious object for aboriginal Australians (Jones 1996). Every hunter had at least a few, often many of various designs for many functions (Jones 1996). They called them “karli,” “belo,” “iringili,” munartajartu,” “pirrkala,” “wallanu,” “warlanu,” “warraka,” “wana,” “murrawirrie,” “ngamiringa,” “yarrakoodakoodari,” “karra,” and many…

View original post 984 more words

Development of a flintknapper

Ringtail Cats

These points are shown in the order I made them. These are all the points I have successfully completed. I began flintknapping late this summer, and had spurts of progress working with the California knappers, and lately by myself.

All are “woodland type” arrowhead points, with exception of the one mahogany small spearhead point.

I used all “primitive” tools, or tools used by stone-age American Indians, not out of pretension but since such tools were made from free materials I already had – meaning I didn’t have to go buy anything like copper billets. The tools I used were mule deer and whitetail deer antlers (for pressure flaking with the tines and using the rosettes for percussion flaking billets), a basalt cobble for a hard hammerstone, sandstone cobbles for soft hammerstones and abrading, and pumice stone for abrading and sharpening my pressure flakers. I made an Ishi-stick pressure flaker from…

View original post 138 more words

Second, third, and fourth knapped points

Ringtail Cats

Second, third, and fourth knapped points

The one on the left was my second point. I got a few tips from expert knapper Ken Peek working on it with the California Knappers (http://www.primitiveways.com/California_Knappers.html). The two on the right I did alone. These are made from cobbles I collected from a stream near the Middle Fork Davis Creek obsidian mine in Modoc National Forest, CA.
I’ve mounted them on the skeleton of an Opuntia cactus I got off some ancient lava beds in New Mexico.

View original post

Seminole Archery Expertise

Ringtail Cats

On close examination I found his bow to be the stem of a small sapling split in halves, with very little finish; but his arrows were a wonder of exact work and feathered on the true scientific principle. I could not bend his bow in the slightest, and, when he had braced it, it would have taken the balls of my fingers off to have drawn an arrow to the head on it, yet his great horny hands used it without trouble, sending an arrow of his make full as far as I could, with my bow, shoot the best Highfield target shaft! My hickory hunting arrows, made at great expense by a cunning carpenter, under my own direct supervision, and pointed by a smith of approved skill, were appreciably less nicely adjusted than his. You could easily discover the difference, watching their flight through a long shot over open…

View original post 315 more words

Santa Barbara Sedge Baskets

Ringtail Cats

Santa_Barbara_sedge Carex barbarae

Santa Barbara Sedge – Carex barbarae

The Pomo Indians of California called this sedge Kä-höm’ which translates “water-gift.”

This species was very often used in basket making, being the white or creamy groundwork of most Pomo baskets (Chesnut 1902).

 Many hundreds of species of Carex are found across the US, and many were used for basketry by the American Indians.

Roots were collected during the summer and early fall (Chesnut 1902). A root end by the plant is grasped between the first and second toes, while a clam shell is used in one hand to scrape away dirt and a stick is used in the other hand to pry away stones and other roots and loosen the ground (Chesnut 1902). Women would gather about 15-20 root strands each day but men only about 10 on account of his long siesta (Chesnut 1902).

To maintain the root’s flexibility and…

View original post 361 more words

My first flint-knapped arrowhead

Ringtail Cats

My first knapped point – small arrowhead percussion and pressure flaked from obsidian collected from the side of bottle rock road near Mt. Konocti, CA. My first knapped point – small arrowhead percussion and pressure flaked from obsidian collected from the side of bottle rock road near Mt. Konocti, CA.

My first knapped point – small arrowhead made from (bubbly=knappably-inferior) obsidian collected from the side of bottle rock road near Mt. Konocti, CA (photos of site in below posts). Made with the help of Dino Labiste with the California Knappers (http://www.primitiveways.com/California_Knappers.html). Arrowhead is atop a weathered obsidian specimen from the same area.

View original post